Thursday, December 22, 2011

Joy to the World of Cookies!

As soon as I heard we were to be hit with snow I ran out to the store and stocked up on all my baking supplies so I could spend all day inside baking. Doesn't get much better than listening to Christmas music, lighting yummy holiday scents, and watching the snow fall while baking delicious goodies that in just a couple days my friends and family will be enjoying. :)

First up are Andes Mint Cookies. I got this recipe awhile back from one of my teammates (thanks Jennie!) and have heard nothing but rave reviews every time I make them. What I love about these cookies is that the Andes mints become the frosting! 

To dress them up for the holiday gift giving I thought it would be fun to use Peppermint Crunch Andes Mints instead of traditional ones. 

I must say, while they are nice and festive...I do like the traditional mint better, as it blends in so nicely with the chocolate cookie.

Andes Mint Cookies
3/4 c. butter or margarine
1 1/2 c. brown sugar
2 T. water
2 c. semi-sweet chocolate chips
2 eggs
2 1/2 c. flour
1 1/4 t. baking soda
1/2 t. salt
36-48 Andes mints

Melt butter, brown sugar and water in a saucepan over med. heat until melted. Then add chocolate chips, stirring until completely melted. Cool for 10 minutes. Pour into a mixing bowl and beat in eggs. Add flour, soda, and salt. Mix together and chill for about 45 min. Roll into balls (1-1 1/2 in.) flatten slightly, and place on a cookie sheet. Bake at 350 for 10 min. Don't over bake. When cookies come out of the oven, place an Andes mint on top of each coolie and allow to melt for a few minutes. Swirl the melted chocolate with the back of a spoon like icing. Allow to cool.


Next mouth-watering treat is another new favorite....Cranberry Crunch Cookie Bars!
We are quite often surrounded by tempting snacks at school and have tried to use our best self-control technique of asking someone else who has already given in, "Is it worth it?" Well my friends, there is no need to even ask with these babies...THEY ARE SO WORTH IT....ever calorie! They remind me of a healthier blondie brownie.

Cranberry Crunch Cookie Bars

1 c. butter, softened
3/4 c. granulated sugar
3/4 c. packed brown sugar
2 t. vanilla
2 eggs
1 t. baking soda
2 1/4 c. flour
3/4 bag of white chocolate chips
1/4 t. salt
3/4 c. craisins
3/4 c. chopped pecans (I made a batch with and without these)
4 c. Cascadian Farm Maple Brown Sugar Granola

1) Preheat oven to 350. Beat butter, sugar, vanilla, and eggs with an electric mixer on low until light and fluffy. Beat in flour, baking soda, and salt until well mixed.

2) Stir in granola, craisins, pecans (if using), and white chocolate chips. Spoon mixture into a well greased 9x13 pan and spread out (about 1/2 in thick.)

3) Bake for 8-13 minutes or until lightly browned on edges. Middle with still be gooey.

4) Let cool, cut into squares, and eat up!


Christmas Playlist-
Tennessee Christmas- Amy Grant
Carol of the Bells- Destiny's Child
Jingle Bells (Robbie Hardkiss Remix)- Duke Ellington
Mistletoe- Colbie Caillat
Hark the Herald Angels Sing- Hot Toddy
Man with the Bag- Kay Starr

Wednesday, December 14, 2011

Lights! Camera! Action! Here Come....Junior Mint Cupcakes!

WOAH! I don't know how long it has been since I have made a post. Life has been very busy these past couple months. Lots of weddings, holiday gatherings, and family events have taken over any spare time. All of which have been a blast, but wow...I'm starting to become quite exhausted. 

I have been promising my husband I would make these suckers for awhile as Junior Mints are his favorite movie time candy. I have already done a bunch of holiday baking (many of which I promise to post once I am on Winter Break) but these just could not wait! They were pretty much "smellicious," the lovely new phrase coined by one of my 1st graders. Oh, how I love them. :) 

I wanted to make my teammates a special treat to say "Merry Christmas!" and thought Junior Mint Cupcakes would be perfect. Classic holiday mint flavor without the repetitive red and white stripes.

Junior Mint Cupcakes
Chocolate cake:
2 2/3 cup flour
1 1/4 cup unsweetened cocoa powder
2 tsp baking powder
1 tsp baking soda
1 tsp salt
1 cup buttermilk
1 1/4 cup of brewed coffee, cooled (I used Starbucks Christmas blend)
1/4 cup vegetable oil
2 sticks of unsalted butter
2 1/2 cups of sugar
1 tsp vanila extract
2 eggs
Mint Buttercream:
2 sticks of unsalted butter, softened
4 cups powdered sugar, sifted
1/3 cup milk
1/4 tsp natural mint extract
Chocolate Sauce:
1 cup dark chocolate chunks
2/3 cup heavy cream
Garnish with Junior Mints if desired.

Preheat the oven to 350. in a large bowl, add the flour, cocoa powder, baking soda, baking powder, and salt. Sift to combined. in another bowl, add the buttermilk, coffee and oil. In a stand mixer, add the butter and cream until light and fluffy. Add the vanilla and while the mixer is on high, slowly add the sugar and cream until well combined. Add the eggs one at a time. With the mixer on medium speed, alternating between the wet and dry ingredients, add each a bit at a time until all three are well combined in the stand mixer. If you are using the cute brown floret baking cups, just place them on a baking sheet, they don’t need to go in a muffin tin. If you are using standard cupcake papers, just line them in the muffin tin as normal. Fill standard cupcake papers 2/3 of the way full and cute floret papers only 1/2 full. Bake until tops spring back when touched, about 20-25 minutes.

Mint Buttercream
In a stand mixer, cream the butter until light and fluffy. Your butter needs to be softened, cold butter won’t work. With the mixer on a low speed, slowly add the powdered sugar until all combined (you can add less if you prefer a less sweet frosting). Then add the milk and the extract and beat until well combined.

Chocolate sauce
Place the chocolate in a heat safe bowl. Heat the cream until hot and steam, but not boiling (microwave is fine but you can also heat on the stove) and pour the hot cream over the chocolate. Stir for about 3 minutes or until well combined.


To present them I used white cupcake boxes with cute Christmas Bakery stickers that I purchased from Cupcake Social and my sister had gotten me some really cute boxes from The Cupboard in Fort Collins to gift single cupcakes with.

Today's Christmas Playlist:

All I Want For Christmas Is You- Mariah Carey 
O Come Emanuel- Haste the Day
Someday At Christmas- Jack Johnson
Baby It's cold Outside- Willie Nelson ans Norah Jones
Oi To The World- No Doubt 


Sunday, October 30, 2011

Spooktastic Cupcakes

We are not doing too much for Halloween this year....just planning on handing out candy to all the cute little trick or treaters. But of course I had to use the adorable cupcake wrappers and boxes I had purchased earlier this month. :)

Last year I made Red Velvet "Brain" cupcakes for Michael to take into work and I couldn't pass up the chance to make them again. I also wanted to attempt these "Bleeding Vampire Bite" cupcakes I have been seeing around. Both were a great success!!! And gone already...

For the Red Velvet Cupcakes I used a recipe from My Baking Addiction
The fabulous part about this recipe is that it only makes 12 cupcakes!


Red Velvet Cupcakes with Cream Cheese Frosting

For the Cupcakes

1 cup cake flour
1/4 cup unsweetened cocoa powder
1/2 teaspoon kosher salt
2/3 cup vegetable oil
3/4 granulated sugar
1 egg
1 teaspoon pure vanilla extract
2 tablespoons red food coloring
1/2 cup buttermilk
1/2 teaspoon baking soda
3/4 teaspoon white vinegar

1. Preheat oven to 350 degrees. Line 12 cupcake wells with paper liners or spray pan with 
    spray with nonstick cooking spray.
2. Sift together cake flour, cocoa powder and salt.
3. In the bowl of a stand mixer fitted with the whisk attachment, combine oil and sugar 
    until well-blended. Add egg and mix until combined.
4. Turn your mixer down to the lowest speed add vanilla then slowly add in the food 
    coloring. Note:If you are using liquid food coloring, it will take about 2 tablespoons of 
    coloring to get a dark red shade. I used about 1 tablespoon of gel dye to achieve the 
    shade in the photographs. Add the dye slowly and color according to your preference.
5. Add flour mixture alternately with buttermilk in two batches; scrape down the side of 
    the bowl. Continue mixing until just combined, taking care not to over mix.
6. Place baking soda in a small dish, stir in vinegar and add to batter with machine 
    running. Beat for about 10 seconds.
7. Using a medium scoop (about 3 tablespoons), divide batter among between the 12 
    wells, filling each well about 2/3 full of batter. Bake for 20-24 minutes or until a   
    toothpick inserted comes out clean. Be careful not to over bake.

For the Cream Cheese Frosting

8 ounces cream cheese, softened to room temperature
2 tablespoons vegetable shortening
3 tablespoons butter, softened to room temperature
1 pound confectioners’ sugar (about 3 ¾ cups), sifted
2 teaspoons clear vanilla extract (to maintain bright white color, I used pure vanilla extract since I was tinting them anyways)
Red and Blue food coloring

1. In a the bowl of a stand mixer fitted with the paddle attachment, cream together, 
    cream cheese, shortening, and butter until well combined.
2. With the mixer of low, gradually add the confectioners’ sugar until thoroughly 
    incorporated and smooth. Add vanilla and mix to combine.
3. Use about 3 drops red food coloring and 1 drop blue food coloring to create grayish 
    brain matter color.


Next, I wanted to use a pale white cake for the vampire bite cupcakes and when I found this recipe for white chocolate cupcakes I knew it would be perfect. They received so many compliments I will definitely be making them again!

White Chocolate Cupcakes 
from Shauna Sever


Makes 18 cupcakes

For the cupcakes

1 3/4 cups all-purpose flour
1 teaspoon baking powder
1/2 teaspoon kosher salt
12 tablespoons (1 1/2 sticks) unsalted butter, at room temperature
1 cup sugar
1 tablespoon pure vanilla extract
8 ounces high-quality white chocolate, chopped bar or chips
1/2 cup unsweetened coconut milk
5 large egg whites
1 can Cherry Pie Filling

For the frosting

6 ounces cream cheese, at room temperature
6 tablespoons (3/4 stick) unsalted butter, at room temperature
1/2 teaspoon pure vanilla extract
1/4 teaspoon kosher salt
4 1/2 ounces high-quality white chocolate, chopped bar or chips
Up to 2/3 cup confectioners’ sugar, to taste

1. Position an oven rack to the center of the oven and preheat it to 350 degrees. 
    Line two 12-cup muffin tins with paper liners, 12 in one and 6 in the other.
2. Whisk together the flour, baking powder and salt. Set aside.
3. In the bowl of an electric mixer, cream together the butter, sugar and vanilla until very 
    light and fluffy, about 3 minutes.
4. Melt the white chocolate in a double boiler. When it’s just warm to the touch, stir it 
    into the butter mixture on low speed, just until combined–it may separate a bit, but it 
    will come back together. 
5. With the mixer on low, alternate adding the flour mixture and the coconut milk in 
    three batches until well-blended. Transfer the batter to a medium bowl.
6. Clean and dry the bowl of the mixer. Whip the egg whites on medium high speed until  
    they reach soft peaks, about 4 minutes. Gently fold the egg whites into the batter in 
    three additions.
7. Fill the muffin cups no more than 3/4 of the way full with the batter. Bake one tin at a 
    time until a toothpick just comes out clean and the tops spring back when lightly 
    touched, about 20 minutes. 
8. Remove cupcakes from tin and place onto a cooling rack, and let them cool completely.

To make the frosting, beat the cream cheese, butter, vanilla and salt together until light and smooth. Melt the white chocolate in a double boiler and cool until it is just warm to the touch. Scrape the white chocolate into the cream cheese mixture and beat to combine. Taste the icing and check the texture–if you like your icing sweeter and with a bit more body, add in some confectioners’ sugar. Set aside.

To make Vampire Bites:

1. Puree cherry pie filling in a blender. 
2. Use a knife to cut a small cone shape out of the center of the cupcake. 
3. Fill center with pureed filling.
4. Frost cupcake and spear two holes (I used a chopstick) into the top of the cake to 
    create bite marks.

 I hope you all have a very Happy Halloween!


Wednesday, October 12, 2011

Banana Cupcakes with Honey Peanut Butter Butter-Cream Frosting

I love following Sunshine and Carousels blog and I have been waiting for Oct. 12th to roll around so that I could test out these babies. Today was my friend Sandy's birthday, and I thought they would be the perfect mid-week birthday treat to help her celebrate her special day. They were to die for! The frosting didn't turn out exactly how I would have liked it to. There was a lot of air pockets as I was piping it out, so it was not as pretty as I hoped for. Oh well, darn....looks like I will have to make them again! ;)


 Banana Cupcakes with Honey Peanut Butter Butter-Cream Frosting

 Ingredients:
2 cup of flour
1/2 cup of butter
1 cup plus two tablespoons of sugar
2 eggs
1 teaspoon of vanilla
1/2 teaspoon of salt
1/4 a teaspoon of baking soda
3/4 a teaspoon of baking powder
1/2 a cup of milk
3 ripe mashed bananas
1 teaspoon of honey

Mix dry ingredients together in a medium bowl and set aside. Cream your butter, sugar and vanilla. Add eggs one a time. Add your milk and flour mixture to your mixture alternating each addition. Add your mashed bananas and mix well. Lastly fold in your honey. Bake at 350 degrees for 19-21 minutes. Makes around 24 cupcakes.

 Frosting:

2 sticks of room temperature butter
4-5 cups of powdered sugar
1 teaspoon of vanilla
2 tablespoons of honey
1/2 cup plus two tablespoons of creamy peanut butter

Cream you butter, slowly add in powdered sugar (about 3 cups worth) until smooth.  Add vanilla and mix. Slowly add in honey and peanut butter and mix until creamy and smooth. Lastly add in a little more powdered sugar (maybe a cup or a cup and a half) until you find the consistency you desire. Should be thick and creamy. (Mine was a little too thick....)


You can drizzle honey over top right before serving if you wish.


I also tried out my cute bakery boxes to deliver the cupcakes in. They were fun! I hope I can find some for the holidays.


Today's Playlist:
(Loving Pandora Shuffle....some oldies but goodies made it on.)

The Way You Make Me Feel- Michael Jackson
Happy Nation- Ace of Base
Satellite- Dave Matthews Band
Only The Wine- David Gray
Merry Happy- Kate Nash
Victim of the Crime- Phoenix 


Wednesday, October 5, 2011

Finally Feeling Like Fall, Time For Some Pumpkin Mac and Cheese

I have been so ready to start cooking some fall favorites but with all the summer like temperatures I have not felt like turning on the oven too much. However, when I received my October Better Homes and Gardens and I found a recipe for Pumpkin Mac and Cheese I knew I had to give in and heat up the kitchen. Let me tell you, it was worth it! Not only was it hit for dinner, but I think I have also found my Thanksgiving side dish.


Pumpkin Mac and Cheese
2 C. dried elbow macaroni
2 Tb. butter
2 Tb. all-purpose flour
1 C. whipping cream
1 C. whole milk (I used nonfat milk)
4 oz. Fontina Cheese, shredded
1 15 oz. can pumpkin
1 Tb. snipped fresh sage 
1/2 C. soft bread crumbs (I used Whole Wheat Panko)
1/2 C. grated Parmesan cheese
1/3 C. chopped walnuts
1 Tb. olive oil

1. Preheat oven 350 degrees. Cook pasta in a large pot following package directions; drain. Return to pot.

2. In medium saucepan melt butter over medium heat. Stir in flour, 1/2 t. salt, and 1/2 t. ground black pepper. Add cream and milk all at once. Cook and stir over medium heat until slightly thickened and bubbly. Stir in Fontina cheese, pumpkin, and sage until cheese is melted. Stir sauce into pasta. Transfer to ungreased 2 quart rectangluar baking dish.

3. In bowl combine bread crumbs, Parmesan, nuts, and oil; sprinkle over pasta. Bake, uncovered, 30 minutes or until bubbly and top is golden. Let stand 10 minutes before serving. Garnish with sage.


So yummy, I am making it again this week :)

Sunday, September 25, 2011

Rosemary and Blue Cheese Chicken Burgers

I ran across this idea from Sunset Magazine before checking my email the other day and it looked too good. I immediately fit into our schedule of dinners for the week. They were so easy and so AMAZING!

All you need is:
ground chicken
fresh rosemary
blue cheese wedges
whole wheat buns

Season ground chicken with fresh rosemary and stuff with blue cheese wedges. Grill over medium heat, 12 minutes on each side and serve on wheat buns.

We also added baby spinach and sauteed onions. YUM!


As a side salad I prepared spring mix greens, black peppered feta, dried cherries, and sunflower seeds, topped with a balsamic dressing.

Today's Playlist:

Passion Pit- To Kingdom Come
Frank Sinatra- Come Dance with Me
Angus and Julia Stone- Big Jet Plane
Miike Snow- Animal

Poblano White Chili

I hope you all stocked up on the season's last batches of green chilies. We sure did! In honor of the start of fall I thought it would be great to share a recipe that incorporates the new cooler nights and the those yummy green chilies. Poblano White Chili is by far my favorite recipe to use green chilies in! It's a perfect transition into fall food....toasty, yet light.

First, you need to start by making Rajas. Rajas are often served as a side side or as part of a soup or stew. They are also fabulous on nachos or tostadas.

Rajas

6 poblano chilies (1 lb.), roasted and peeled
2 t. vegetable oil
1 large onion, thinly sliced
2 cloves garlic, peeled and sliced
1 t. dried oregano


1) Slice poblanos into 1/4 in strips.
2) Heat oil in skillet over medium heat. Add onion and garlic, and cook 5 to 9 minutes, or until onion is soft and golden brown. Add oregano and poblano strips, and cook 3 to 4 minutes more, or until heated through. Season with salt and pepper, if desired.


Poblano White Chili
from Vegetarian Times


3 cups cooked white beans or 2 15 oz. cans white beans, rinsed and drained
1 recipe Rajas (above)
2 cups low-sodium vegetable broth
2 t. dried oregano
1 t. ground cumin
1 cup fresh or frozen corn kernels
1/2 cup chopped cilantro
1 Tb. lime juice
1/4 cup low-fat milk
3 oz. goat cheese
1/4 cup roasted pumpkin seeds


1) Bring beans, Rajas, broth, oregano, and cumin to a simmer in a saucepan over medium heat. Cook 15 minutes, stirring occasionally. Stir in corn, cilantro, lime juice. Season with salt and pepper, if desired. Cook 2 minutes more.
2) Warm milk in a separate saucepan. Add goat cheese, and stir until smooth. Serve chili garnished with goat cheese sauce and pumpkin seeds.


We paired it with a simple red blend, St. Francis Winery's 2007 Red Splash.

Sunday, September 4, 2011

Easy Cake Bite Cones

I had my "family share" at school on Friday and wanted to bring my kiddos a treat that they would love and was fun too! Thursday night I was still trying to figure out what I could make, when I came across this recipe. These babies are so easy! It took some time....as the cake bites have to freeze for a couple of hours, but the rest was a piece of cake (haha!) 

Easy Cake Bite Cones
1 package cake mix (any flavor) -I used German Chocolate
1 jar Nutella- (you can also use any can of frosting)
dipping chocolate
sugar cones or mini cake cones

Make your cake according to package directions.

Once the cake has cooled, crumble into a bowl. Stir in a jar of Nutella.

Scoop the mixture into balls with a cookie scoop then roll between your hands to smooth and place on a cookie sheet. Place cookie sheet in the freezer and freeze solid. 

Once frozen dip balls into melted dipping chocolate and sprinkle with sprinkles. Allow to set.

Place in sugar cones, and ENJOY!

My class loved them!!!!! Apparently I'm the best cook around. :) Ahhhh, they are so sweet.

I am looking forward to making these again (already thinking of all kinds of flavor combinations,) but next time they will be homemade instead of all the boxes and cans.

Monday, August 29, 2011

Mini Key Lime Pies

Happy birthday, Dad!!!

My dad has been the rock of our family lately. Staying positive and strong when we have needed him the most....even when he is being faced with challenges himself.

My parents and sister recently spent a week in Key West and as soon as they got off the plane my father was in search of some Key Lime Pie. In fact, I'm pretty sure that's why they went there in the first place. While I'm sure it doesn't compare to the real thing, I could not think of anything better than to celebrate his special day then by making Key Lime Pie.


Mini Key Lime Pies
slightly adapted from Idle Wife

crust:
1 1/2 cup graham cracker crumbs
1/4 cup sugar
zest from one lime
 6 tablespoons salted margarine, melted

Line muffin tin with cupcake liners. Combine the crumbs, sugar, and lime zest (on hindsight, I would crush the zest throughout the sugar first). Mix in the melted butter until everything is evenly moist.
Take the crumbs and divide them as equally as you can into a 12 cup nonstick muffin tin. Using a cup that approximately fits the bottom of the tin (or a spoon works fine, too), push the crumbs down to the bottom.
Bake in a 350 degree oven for about 10 minutes (mine puffed up and freaked me out, but they settled back down when they came out). Allow to cool.

filling:
2 egg yolks
1  14 oz. can fat free/low fat sweetened condensed milk 
1/2 cup key lime juice (the equivalent of exactly one pound of key limes)

Mix the condensed milk and egg yolks together until combined. Add the lime juice and stir to combine. It will thicken up almost instantly.
Divide batter evenly into each graham cracker cup. Cook at 350 for 15 minutes. Cool and chill in the fridge for about an hour.
 
topping:
Fresh Whipped Cream:
1 Cup Heavy Cream, chilled
1 Tablespoon Granulated Sugar
1 Teaspoon Pure Vanilla Extra
In a stand mixer, whisk the heavy cream on high until it just holds stiff peaks. Slowly sprinkle in sugar. Add vanilla.
Pipe onto pies.
 
Garnish with a lime slice. Enjoy!

Saturday, August 27, 2011

Colorado Green Chile

This is the best green chile recipe I have found so far. Perfect for enchiladas, smothered burritos, scrambled eggs, or even with tortilla chips.

Colorado Green Chile

Ingredients

  • 1 tablespoon olive oil
  • 1 1/2 pounds cubed pork stew meat
  • salt and pepper to taste
  • 1 large yellow onion, diced
  • 4 cloves garlic, minced
  • 2 cups chopped, roasted green chiles
  • 1 (14.5 ounce) can diced tomatoes with juice
  • 1 1/2 cups tomatillo salsa
  • 5 cups chicken broth
  • 1/2 teaspoon dried oregano
  • 1 pinch ground cloves

Directions

  1. Heat the olive oil in a Dutch oven or large pot over medium-high heat. Season the pork with salt and pepper to taste, then place into the hot oil. Cook until golden brown on all sides, about 7 minutes. Once browned, remove the pork and set aside. Reduce heat to medium, and stir in the onion and garlic. Cook and stir until the onion has softened and turned translucent, about 5 minutes.
  2. Return the pork to the pot, and stir in the green chiles, diced tomatoes with juice, tomatillo salsa, and chicken broth. Season with oregano and clove. Bring to a simmer over medium-high heat, then reduce heat to medium-low, cover, and simmer 20 minutes.
  3. After 20 minutes, remove 2 cups of the soup (ensure there are no pork cubes in it), and pour into a blender. Hold down the lid of the blender with a folded kitchen towel, and carefully start the blender, using a few quick pulses to get the soup moving before leaving it on to puree. Puree until smooth, then pour back into the cooking pot. This will create a thicker texture for your chili and will eliminate some of the chunky bits of chiles. Continue to simmer, stirring occasionally until the pork is very tender, at least 35 minutes more.

Extremely Easy Samoa Bark

Well, It's official! I survived my first week back to work. I have an adorable class this year and I'm really looking forward to getting to know them better as the year progresses. 

The first week back is always a crazy one! Waking up early, running here, running there, and there is a never ending to do list. I  was staying pretty composed, until my husband reminded me that I had agreed to make something for his potluck final at school. I panicked at first, but then immediately turned  to Pinterest to find something quick and easy. That's where I came across Samoa Bark. Since Samoas are one of my favorite Girl Scout cookies I had to give it a try.

Samoa Cookie Bark

12 ounces semi-sweet chocolate, plus 2 ounces for drizzle (I used Baker’s chocolate)
35-40 shortbread cookies
3 cups shredded coconut
1 14oz pkg caramels, unwrapped
2 Tablespoons water
1. Line a rimmed baking sheet with foil. Prepare 12 ounces of chocolate according to package directions (I microwaved in 30 second intervals, then stirred until melted, but you can use a double boiler if you prefer). Spread chocolate in an even layer on the foil to your desired thickness; I did mine thinnish. Immediately press shortbread cookies onto melted chocolate, covering it in an even layer. Pop in the freezer until hardened and solid and chocolate has set, about 20 minutes. You want to make sure your shortbread/chocolate layer is good and solid so your bark stays together (like me and Jessie–sorry).
2. Now prepare your filling. Toast your coconut in a pan over low-heat until nice and toasty. Watch it, though, since coconut toasts fast and you don’t want it to burn. While coconut is toasting, unwrap your caramels and melt them in 30-second intervals with the 2 T water until smooth and melted. Stir toasted coconut into caramel sauce, and spread evenly over your shortbread bark layer.
3. Melt remaining 2 ounces of chocolate and drizzle over the caramel… because obviously, it’s a must.
4. I popped my bark back into the freezer to set the drizzled chocolate, but please eat this bark at room temperature–the caramel hardens quickly, and the last thing I need is a lawsuit for broken incisors. Store airtight.


 It was so fast and easy! I knew no leftovers would be making their way back home so I also made some individual serving size treats.
Some favorites from today's playlist:

Paper Aeroplane- Angus & Julia Stone
Someone Like You- Adele
Stereo Love- Edward Maya & Vika Jigulina


Sunday, August 21, 2011

Baked Chile Rellenos with Smoky Tomato Sauce

Wow! I can handle some temperature, but holy mole these babies were HOT!!!!! That might have something to do with the fact that I decided to get "hot" roasted chilies from the Landavazo Chile Connection. We are so use to everyone telling us things are "hot" and when in fact, they are not even close to lighting our mouths on fire...but they were not lying this time.

I found a great healthy recipe in the Vegetarian Times that sounded to good to pass up. Plus, I needed to get rid of another dozen tomatoes....


Baked Chilies Rellenos with Smoly Tomato Sauce


6 large poblano chiles (roasted and peeled)
2 tsp. olive oil
1/2 medium onion; chopped (1 cup)
1 medium zucchini; chopped (1 cup)
1/2 C. fresh or frozen corn kernels
1 C. shredded Monterey Jack cheese
1 large egg
1 cup panko breadcrumbs (I used whole wheat)
1/4 c. chopped cilantro
1 lime, cut into 6 wedges
sour cream or plain yogurt


Sauce
2 tsp. olive oil
1/2 medium onion; chopped
2 tsp. chili powder
1 tsp. ground cumin
1 28 oz. can whole tomatoes (I used about 10 fresh tomatoes instead...boiled and peeled)
1 can chipotle chile in adobo sauce; drained


Preheat oven to 425 degrees. Heat oil in skillet over medium heat. Add onion and cook 5 minutes, or until soft. Add zucchini and corn, and cook 5 more minutes. Transfer to bowl and stir in cheese.


Cut 3-inch slit in each chile, and remove seeds with spoon. Stuff each chile with 1/2 C. zucchini mixture and secure close with toothpick if needed.


Whisk egg with 1/2 C. water in bowl. Spread breadcrumbs on plate. Dip chiles in egg wash. Coat with breadcrumbs. Place on baking sheet, and bake 15-25 minutes, or until golden brown.


To make sauce: Heat oil in saucepan over medium heat. Add onion, chili powder, and cumin, and cook 4 to 5 minutes, or until onion is soft and spices are fragrant. Add tomatoes, and simmer 10 minutes, breaking up tomatoes with spatula. Transfer to blender, add chipotle chile, and blend on low speed until sauce is smooth. Serve with Chiles Rellenos, cilantro, lime wedges, and sour cream.


We also added some Spanish Rice.


This recipe was one of the best I've made in awhile!

Thirty-One: Take Two

Ohhhh we loved Thirty-One so much that my mother-in-law decided she would love to host a party as well. It was a busy weekend, but we managed to squeeze it in and even had a bigger spread than before.

I didn't have to do as much prep as before but I knew I had to make apple nachos again
....and I had some leftover wonton wrappers so I pulled together a yummy little appetizer that got lots of compliments! May I present to you Goat Cheese and Fig Wontons...


Fig and Goat Cheese Won Ton Cups
(adapted from: www.inspiredtaste.net)
 
24 baked wonton cups, cooled
6 ounces goat cheese, at room temperature
4 tablespoons fig jam
4 tablespoons chopped walnuts
3 sprigs of thyme

24 wonton wrappers
Preheat oven to 350 degrees F.
Take a mini cupcake pan and fill each cup with one wonton wrapper then bake in the oven for 7 to 9 minutes. Cool.

Place a little fig jam at the bottom of each baked won ton cup. Add a dollop of the room temperature goat cheese on top of the jam, sprinkle with a few chopped walnuts and add a leaf of thyme to the top.

Can't wait to get all my goodies from the party!!!! Love being organized!!

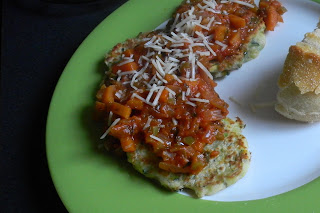
Homemade Spaghetti Sauce and Zucchini Pancakes

Yikes, a little behind on posts again. Back to school....no more free time. :( This is from a couple of weeks ago, but I hope you all enjoy it anyway.

I got very lucky last year when I found this recipe and it was exactly what I was looking for. A homemade tomato sauce with a chunky garden taste! I love that it gets rid of a bunch of tomatoes and we can use it on many different dinners.

With our 1st batch we decided to go with zucchini pancakes. They may sound a little odd but they are incredibly delicious. 

Homemade Tomato Sauce

10 ripe tomatoes
2 TB olive oil
2 TB butter
1 onion; chopped
1 green bell pepper; chopped
2 carrots; chopped
4 cloves garlic; minced
1/4 C. fresh basil
1/4 t. Italian seasoning
1/4 C. red wine
1 bay leaf
2 stalks celery
2 TB tomato paste

Bring Pot of water to boil. Have ready a large bowl of iced water. Plunge whole tomatoes in water until skin starts to peel. Remove with a slotted spoon, and place in ice bath. Let rest until cool enough to handle, then remove seeds and peel. Chop 8 tomatoes and puree in blender. Chop 2 tomatoes and set aside.

In a large pot or Dutch oven, over medium heat, cook onion, bell pepper, carrot, and garlic in oil and butter until onion starts to soften. About 5 minutes.

Pour in pureed tomatoes. Stir in chopped tomatoes, basil, Italian seasoning, and wine. Place bay leaf and celery in pot. Bring to boil, then reduce to low, cover and simmer for 2 hours. Stir in tomato paste and simmer another 2 hours. Discard bay leaf and celery. Serve.

Zucchini Pancakes

1/2 C. all-purpose flour
1/2 C. grated Parmesan cheese
1/2 t. dried oregano
salt and pepper to taste
1 1/2 C. shredded zucchini
1 egg; beaten
2 TB onion; chopped
2 TB mayonnaise ( I use vegannaise)
2 TB butter or margarine

In a bowl, combine flour, cheese, oregano, salt and pepper. Combine the zucchini, egg, onion, and mayonnaise; stir into dry ingredients until well blended.

In a large skillet, melt butter. Drop zucchini mixture by cupfuls into skillet; press lightly to flatten. Fry until golden brown, about 2 minutes on each side. Drain on paper towels. Serve with homemade tomato sauce and sprinkle with Parmesan cheese.

You can also have these for breakfast or brunch by serving with sour cream instead...yum!


Wednesday, August 10, 2011

Bloody Mary Short Ribs......and Strawberry Shortcake too!

Last night we had our dear friend Meghan Shaw over for dinner. Meghan and I grew up together and have shared so many memories, as we did almost everything together.....playing numerous card games under the swim team tent snuggled in our sleeping bags, suntanning on the top of the houseboat in Lake Powell (never wearing enough sunscreen :( ,) spending day after day at the pool, creating secret words; like CLP (cutie pie lifeguard) and "grapes." Haha, I will always cherish these times!!! Meghan was also our wedding photographer and for those of you that have seen our wedding photos you probably already know this, but she has an incredible eye for the perfect photos. Very talented! I encourage you all to head over to her blog, Meghan Shaw Photography, and check out some of her work. She is also getting ready to start a new chapter in her life by moving to Canada for graduate school and we could not be more excited for her!!! I'm glad we got to spend a little time with her before she "takes off to the Great White North."

On the menu:

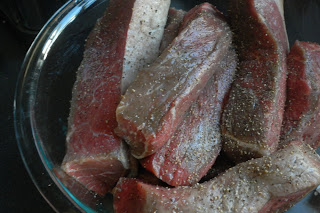
Bloody Mary Short Ribs

Ingredients
4 lbs. beef short ribs ( I used 3...and there was plenty left over)
salt and pepper to taste
2 TB olive oil
2 TB butter
1 large onion; sliced into rings
2 leeks (white portion only,) sliced
1 C. red wine
1 C. beef stock
1 (28 oz.) can diced tomatoes
3 cloves garlic, minced
3 C. bottled Bloody Mary Mix ( I used Demetri's ...yum!)
6 large carrots, peeled and cut
20 small mushrooms, stems removed

Directions
1. Preheat oven to 350 degrees. Season the short ribs with salt and pepper, and set aside.

2. Heat an oven-proof Dutch oven, or wide shallow pot with a lid, over medium high heat. Stir in the olive oil and butter until the butter had melted. Stir in onion, and cook until the onion begins to soften, about 3 minutes. 

Add the leek, and continue cooking until the onion and leek are lightly browned. Remove from pan and set aside.

3. Brown short ribs in the hot dutch oven until browned on all sides, about 3 minutes per side. Once browned, sprinkle the reserved onions over the ribs, pour in the wine, beef stock, tomatoes, garlic, and Bloody Mary mix. Nestle the carrot chunks among the ribs. Bring to a simmer, then cover, and place into the preheated oven.

Braise in the oven for 2 hours, then add the mushroom caps, recover, and continue cooking 1 hour more.

We served this with our May wine club wine, John Alan 2008 Malcontent, which is a bold blend of Malbec, Petite Verdot, and Zinfandel and is aged for 24 months in 100% french oak!

Meghan was so sweet to bring over a salad and coleslaw as sides, and homemade Strawberry Shortcake w/ Cream Biscuits for dessert.
Strawberry Shortcake- Makes 6

Ingredients
4 C. fresh strawberries, hulled and sliced
1/4 C. sugar

Topping
1 C. heavy cream
1/2 t. vanilla extract
1 T. sugar, or to taste

Cream Biscuits
1 1/2 C. all-purpose flour
1/4 t. salt
4 t. sugar (optional- Meghan used cinnamon sugar)
2 t. baking powder
6 T. cold butter, cut into small pieces
3/4 C. heavy cream

1. In a medium bowl, combine the strawberries and sugar. Set aside at least 15 minutes.
2. Preheat the oven to 400 degrees. 
3. In a large bowl, combine the flour, salt, sugar (if using) and baking powder.
4. Cut the butter into the flour with a pastry blender or your fingertips. The pieces should be the size of small pies.
5. Measure cream; set aside 1 tablespoon. Add the remaining cream to the flour, and stir with a fork until the mixture just comes together. Lightly knead the dough a few times in the bowl, turn it out onto a lightly floured board, and roll out about 3/4 inch thick.
6. Place the biscuits on a baking sheet lined with parchment, and brush the tops with the tablespoon of cream.
7. Bake for 17 minutes or until golden and done.
8. In a standing mixer with the whisk attachment, whip together the cream, vanilla, and sugar until it starts to form soft peaks.
9. Slice the Cream Biscuits in half. For each biscuit, spoon the strawberry mixture onto the bottom half, and add a dollop of whipped cream. Top with the other half, and dust it with powdered sugar if desired.

Today's Kitchen Playlist Included:
Florence + The Machine- Drumming Song
Phoenix- If I Ever Feel Better
Adele- Set Fire to the Rain
Phoenix- Lasso